Showing posts with label art. Show all posts

Saturday, October 26

summer lists

Every June I have the boys make a list of things they would like to do over the summer. The list usually includes having cousins sleep over, play dates with friends, family activities, camping, day trips and things to make. We hang it in the fridge and check off as many items as we can. It is fun to look back and see the fun things we accomplished just by writing them down.

One thing new this year, was picking a design for a t-shirt. We bought shirts in their size for three dollars each at a craft store and after they finalized their design we bought some fabric paint. I prewashed and then ironed the shirts before painting them. And I also put cardboard inside the shirt so the paint wouldn’t get on the back side. My middle guy wanted Clyde, the orange ghost from Pac-Man. And my youngest wanted the Indiana Jones hat and whip on his shirt. I hand painted the shirts and the boys were thrilled with how they turned out! Here are the results.


Oh, and I started my first quilt! I am so excited! I’ll post pictures soon!

Thursday, October 25

Link Love #3 ~ keepin' little hands busy


I have always loved making things with my hands. I remember my mother teaching my sister and me how to sew when we were very young. The first thing I made was a pillow. Soon I moved onto making heart shaped pillows with a single ribbon sewn and tied in a bow on the front. I remember giving one to a lady who was visiting us and she took it with her back to India where she was a missionary. I thought it was so neat that something I made was in India.


I think it is important that children’s hands have something to build, stack, mush, organize, dig, pour, balance, etc. That is one of the things I loved about my childhood: the environment my parents intentionally provided for us. My parents had a very modest income as they served the church and our community but they made sure that we had what we needed and my parents were very resourceful and creative with the rest. For building blocks, my father cut up two-by-fours into small, medium, large and triangular blocks and all five of us kids played with them for hours and hours and hours. I am not kidding. I remember going to the basement with my siblings to play blocks. Peter, my oldest brother, was in charge of dividing the blocks evenly between the siblings when we played Town. Those blocks were used for marble runs, castles, mazes, obstacle courses and countless other purposes that kept us entertained.

We also spent a lot of time building, drawing, cutting, painting, creating and using our imagination. Television was very limited until we got older. I think this is a major reason why all of my siblings are very creative in one way or another.

I love getting inspiration from these websites that help me think of new ways to keep my boys hands busy. They encourage me to do something fun, simple or challenging with the kids.

Take a look and see if you get inspired to make something too!

Made by joel has some really cute ideas to do with your kids. My boys and I made the zip line a while back and loved it!

The long thread has some really great ideas too.  I plan on doing this with the kids soon!

Tinkerlab has a whole section on fun science stuff for kids.

Check out this cute sewing basket over at inner child fun!!!

Make has some cool things to build with older children.

And for some brainy play, check out E is for Explore! 


My mom and dad and my siblings.  I am on my mother's lap.  There are a lot of little hands to keep busy!


Thursday, September 6

s.m.i.l.e

I stumbled upon Color Me Katie’s blog a while ago and found it happy and, well, happy! When life gets blue, I bypass my regular news websites and choose to focus on positive things to keep moving. Those things are, in order; God’s promises in the Bible, going down my mental list of things I am forever thankful for, extra sleep, eating healthy food, saying no to unnecessary stuff, calling family, taking a walk and perusing happy/inspiring websites.


When I saw the little things Katie did around her neighborhood just to make someone smile, I giggled. Check out this link that inspired me to paint my own little rock. I have it outside my door and every time I walk in my house I smile.

I may just make some more and put them around the neighborhood!


Friday, June 15

Spare yarn & sticks

My boys gravitate toward sticks. Whenever we are outside they are always finding the perfect walking stick or saying “this stick would be perfect for a bow and arrow!” It doesn’t matter how big or how small, we always end up with several “perfect sticks” when we hike through the woods. I don’t mind: sticks are free and are great for imaginative play.

The other day I thought about how they could decorate them. I pulled out some spare yarn and told them they could pick out several colors and they could each wrap a stick. They were very excited and had fun picking out the colors and thinking of different ways to wrap the sticks.

I like how they turned out.


Free sticks and spare yarn…a very easy and low cost craft!

Sunday, February 12

stop. motion. video.

My husband has helped the boys create a couple stop motion videos with LEGOs. After seeing their cousins claymation video they were inspired and ran out and bought some clay.


These are some of the creations they made so far.


Hopefully, I can upload a video when we get around to filming.


These are my little creations.


Here is a darling stop motion video I stumbled upon! Enjoy!

Friday, January 27

i like...


This week has been rough. My husband continues to get better but it is a slow recovery and my youngest randomly threw up Sunday night then felt fine and today the same thing. I don't know what is up. Maybe he is sick of all of the sickness like me.

So, I am ‘liking’ these little pictures that are coming from my boy's imagination and little fingers.


snow/ice castle

They are not in the ultra-critical-art-stage yet
and I am enjoying this as it will change all too soon.


alphabet ‘I Spy’ game


cutest ninja ever

One thing I am proud of, is teaching them, by example, to work with a 'mistake' on a picture. If they start drawing something and it doesn't turn out quite like they thought it would, I told them to simply work it into the picture instead of pouting and starting all over with a new piece of paper.

An odd looking turtle can become a rock, drawing a box or a door over the 'mistake' can save a picture that has been slaved over.

They now excitedly skip over and announce, "Look, Mom, look how I worked with my mistake!"

It is a good life lesson to pass along to our little ones and onto ourselves.


love

Wednesday, November 30

The Library Phantom returns…


I love this story.

A little magic, a little mystery, and a smile for all.

A small tribute to the wonder of books and to the libraries around the world.


***

And do you remember this book a while back?

A Treasure's Trove: A Fairy Tale about Real Treasure for Parents and Children of All Ages


Sunday, October 30

cute Halloween decorations

I didn’t grow up celebrating Halloween so I am always caught off guard as far when and what to put up around this time of year.

On the other hand, my husband grew up very involved in the Halloween festivities. His father worked actively in an organization that raised money for Special Olympics. Their most popular fundraiser was designing, building, and running a haunted house that drew thousands of people and thus raised a lot of money for a very special cause. My husband talks about going to the haunted house as a young boy, years later - helping to build sets and then when he was old enough, acting in some of the rooms. It is more nostalgia for him then for me, so we compromise.

As a mother of young boys, I am also sensitive about what images I want displayed in my house. Most of the Halloween decorations available in stores are either too expensive or too gory.

So I came up with my own Halloween decorations/crafts that won’t wake my kids up in the middle of the night and it can save a little money too.

I made this owl out of brown, black, white and orange construction paper I had in the art supply area. I love his cute little eyes.


I also made a brown branch for him where he can keep an eye on things!


He’s a real hoot!

****

I love cats. I actually really want a cat of my own, and I can’t (one family member has asthma). I tend to improvise when I can.

So, I decided to make a cute, black, paper cat of my own. I drew an idea of the kind of shape and expression I wanted of the cat. When I got as close as I could to the idea, I put some black card stock paper underneath and traced it again really hard with a pen.


This left an imprint on the black paper which I cut out with scissors and then the eyes/mouth with an X-Acto knife.


Green tissue paper was perfect for the eyes as it let some light come through.


I just glued them on the back.


I think my little black cat is purrrrfect!

****

These little, black bats are so cute you might be tempted to take one home. I cut them out of black poster board and then traced them with a white colored pencil.


The eyes were easy to make with a hole puncher.
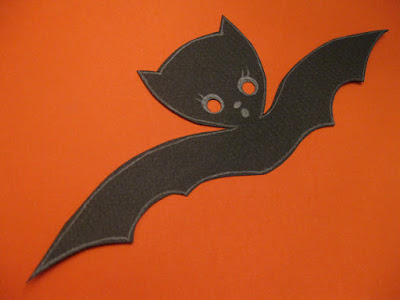


I was happy I finally found a reason to use the patient, white colored pencils that never get used.


These bats look great on windows or hanging from a ceiling!

****

I like to set out battery-operated candles on our ledges so I made this little owl cover for one. I folded brown construction paper in half and then in half again, drew a little owl and then cut it out.


I used the hole puncher for it’s eyes too!


After I unfolded it, I added more details, then taped the two ends together and dropped a little, battery-operated candle inside.


****

I wanted to do a simple Halloween craft with the kids using things I already had around the house. I pulled out some Styrofoam egg cartons, toothpicks, an inkpad and a clear stamp block. They drew some pictures on the Styrofoam and then we cut out the shapes. We taped them onto the clear stamp block and pressed them on the ink pad and then on paper. They turned out really cute.


The boys really liked making ‘their own stamps’. After they skipped away from the table I tried the same technique but on craft foam. They turned out much clearer. Here are the ones with the craft foam.


(Please notice the one nail I got painted that day!)


Here is a darling mummy craft I did last year with the boys using string and popsicle sticks.

Enjoy and have fun!